- Which Kobo Model?
- Your new Kobo – firmware update
- Your new Kobo – backup the SD Card
- Connecting an instrument to a Kobo – overview
- Removing the rear cover
- Inside a Kobo – Serial port
- Inside a Kobo – SD Card
- Inside a Kobo – Battery
- Dissembling a Kobo
- Connecting a Bluefly to the Kobo
- Connecting a GPS-only to the Kobo
- Connecting a Skydrop to the Kobo
- Connecting a FLARM to the Kobo
- Encapsulating your GPS or Bluefly
- What can go wrong with a Kobo?
-
Which Kobo Model?
Kobo models suitable for conversion are highlighted yellow/blue in the table below. If you are buying a new kobo, then the Kobo Nia is the recommended model.
If you are buying second hand, then both Nia and Clara HD are good, as are the Glo HD and Aura Edition 2. Avoid the older models (2011~2015 in table below) as many examples have developed ghosting with age. Likewise, the HD screens (212dpi or 300dpi) are far superior to the older 170dpi, plus runtime has improved considerably on the newer models.

Notes:
- XCSoar unsupport on these models, but proven to work
- Trivial issue – EXPORT USB STORAGE doesn’t work
- Trivial issue – 1st screen will be blank, but subsequent screens OK
- N905C recommended (N905B has poor screen, N905 bricks)
- These older units prone to developing ‘ghosting’
- Pressing case edge can invoke full reset (workarond exists)
- XCSoar works, but no SD card hence unrecoverable
- Construction undesirable for reassembly
- Untried
* Note that some regions (Turkey and Australia) have seen a ‘version 2’ of the Aura 2 that doesn’t work with XCSoar – it will brick.
.
-
Your new Kobo – firmware update
The first thing you should do with your new (or second hand) Kobo before loading XCSoar is to update the Kobo firmware. This is easer than it sounds and automatic; all you need to do is turn on the Kobo for the first time, and when prompted select ‘Connect to Wifi‘. Once you have entered your Wifi password and a connection made, your eReader will check with Kobo.com to see if the firmware is up to date; if it is, it will tell you. If not, it will download the latest firmware, and then install/restart; all of this happens automatically without intervention, and typically takes 2~3 minutes.
This step was especially important for the now discontinued Kobo Mini; without it, it was discovered that the Mini could sometimes mysteriously ‘freeze’ mid flight
.
-
Your new Kobo – backup the SD Card
It is also a good idea to remove the rear cover (covered further below), remove the internal SD Card, and take a Digital image of the entire SD Card. This backup will allow you to recover the Kobo in case anything ever goes wrong (e.g. failed software update, error whilst uploading maps, etc). You will need a special utility such as the freeware win32diskimager which takes a byte-by-byte copy (‘Digital Image‘) of the entire SD Card. A normal SD Card ‘copy’ is inadequate as there are two partitions on the card, one Linux (the operating system) and one with a windows-like file structure.
If you unlucky enough to not have a digital image and need one, please contact us and we can usually help (the email is on CHOOSE/BUY tab)
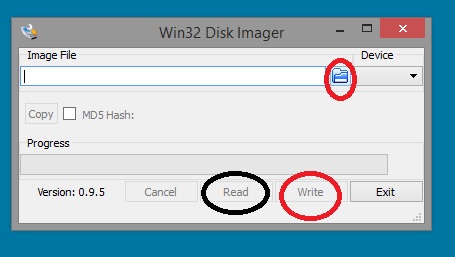
Win32diskimager can befound via google at sourceforge.net. Once started, the app has just one pop-up; see the image below. Once your SD Card is plugged into the computer, it will be recognised in the Device drop-down. Next, pressing the Icon to the left of the Device drop-down will prompt you to enter the filename you want the digital image stored as, and the location to store it on your computer. You then press READ, which READ’s from the SD Card and writes to your computer. If ever you needed to recreate the SD Card, then its the same process except you choose a previously created digital image and press WRITE.
.
-
Connecting instruments to a Kobo – overview
There are 3 ways of connecting your instrument (e.g. a GPS) to the Kobo which are:
- Using a wired connection to the internal serial port on the PCB
- Bluetooth, using a Bluetooth chip connected to the internal serial port on the PCB
- Using a USB-OTG connection via the Kobo’s micro USB socket
The proven and recommended method is a wired connection. With the instrument hardwired and attached to the Kobo you have one, self contained and simple/reliable unit.
The downside of Bluetooth is that the Kobo will still require modification, the Bluetooth chip requires some geeky programming to correctly ‘pair’ and both instrument and Kobo will consume more power and drain the battery faster Whilst Bluetooth is generally reliable, it is still another layer of technology that can potentially mess up your valuable flying day.
Using USB-OTG may seem attractive, but the micro USB on the kobo wasn’t designed for frequent use (when used as an Ereader it only needs charging once per month). 3 years of visibility of 1,000’s of Kobo users has shown that the Kobo’s USB socket needs to be treated carefully. The additional stress of having a USB plug attached and jolted around in flight (typical on a PG or HG) will eventually cause the USB socket to separate from the PCB – more detail further below in ‘14. What can go wrong‘.
.
-
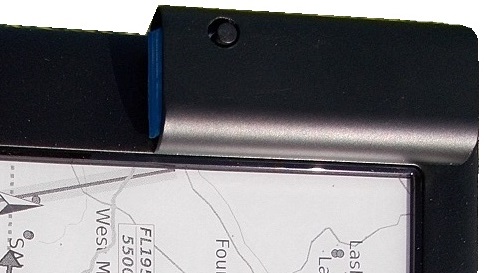
Removing the rear cover
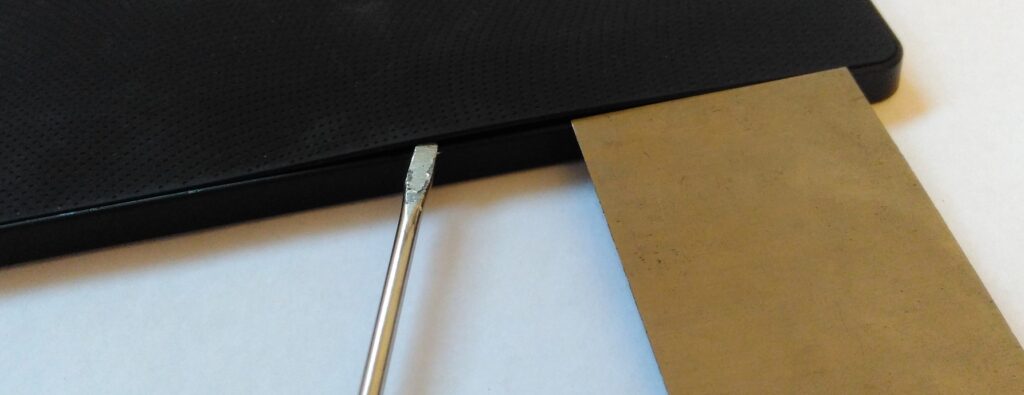
All Kobo’s (except the Mini) have one removable rear cover. Use a thin blade (like a putty spreader, see 2nd photo below) to start revealing a small gap. Thereafter, twist the flat edge of a small screwdriver at 10~20mm intervals to progressively release the cover.
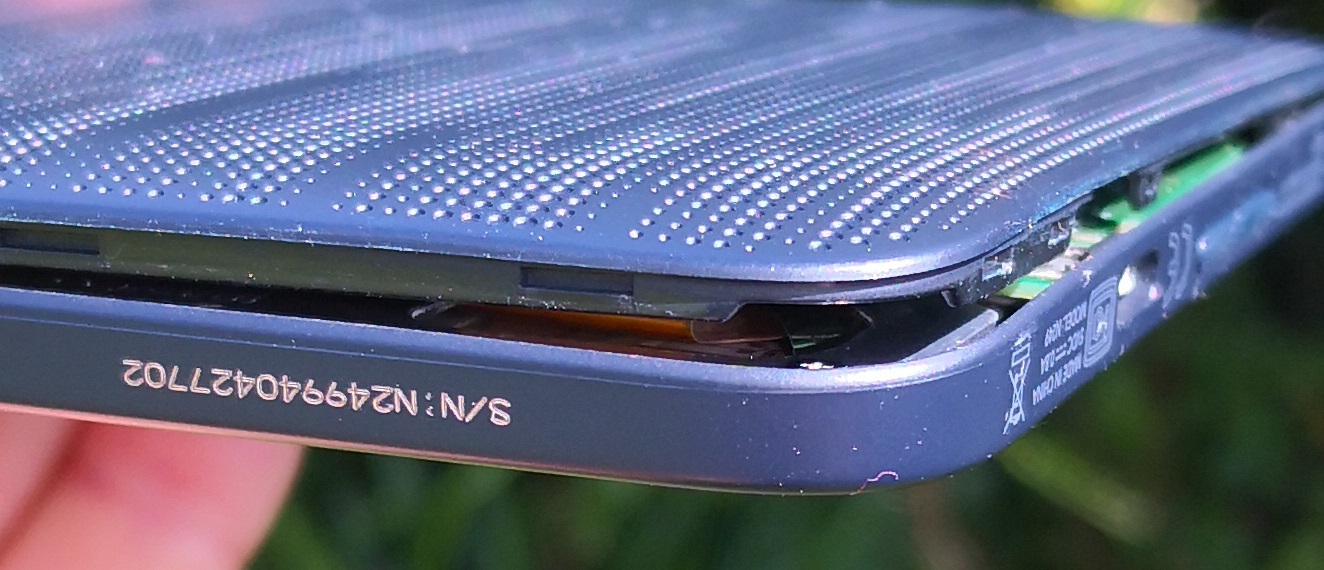
Kobo’s since 2016 are very compact and crammed inside, and the glass membrane of the eInk screen is VERY close to edge of the body. Take care to avoid terminal damage. Here is an example of the Clara HD for guidance of what to expect:
Note that the Mini is different. The first rear cover on the Mini simply ping’s off (there is a recess on one corner). It will feel brutal, but it never breaks. The second rear cover has 6 tiny Philips screws.
.
-
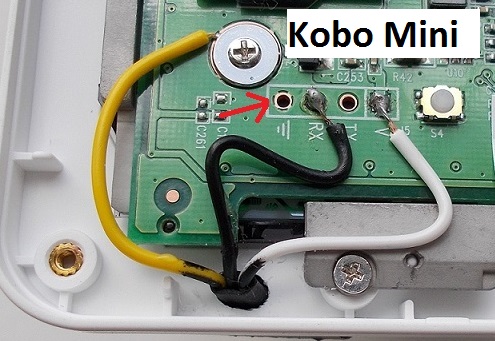
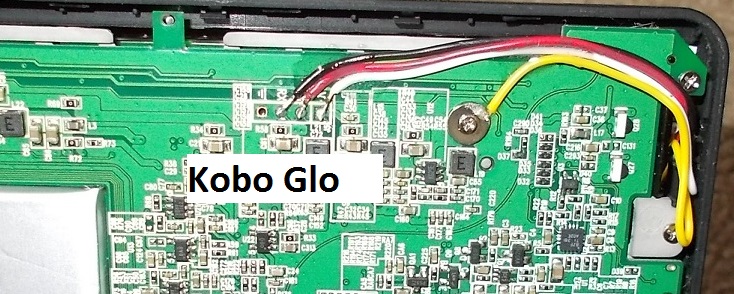
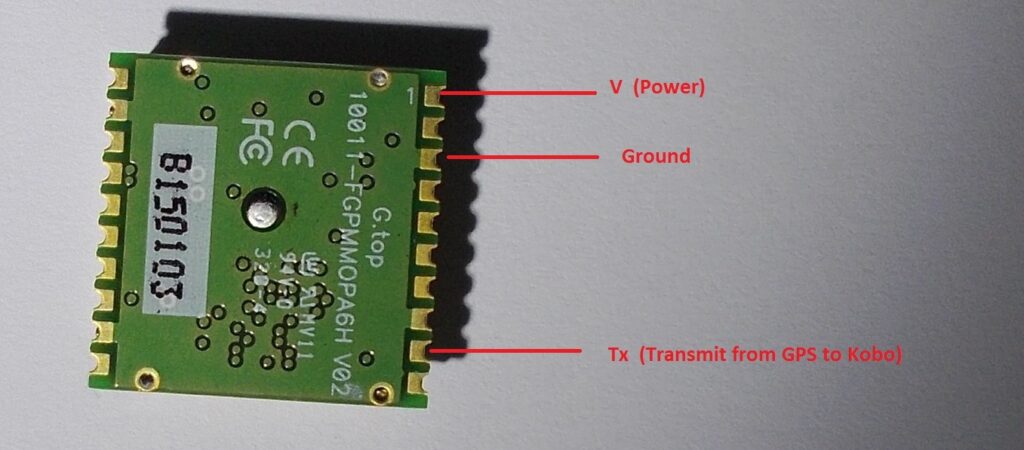
Inside a Kobo – the Serial port
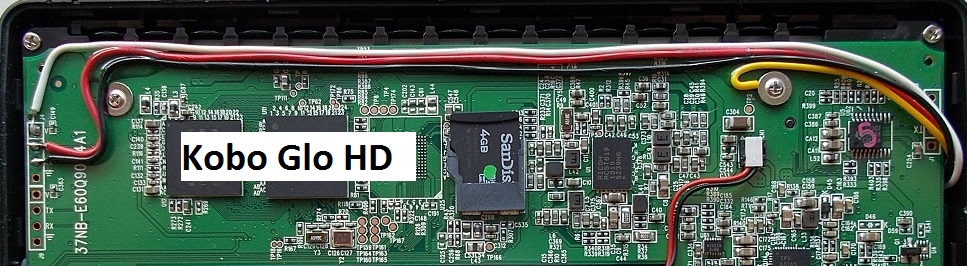
Most Kobo’s typically have 3 or 4 serial ports, but only one is functional. The serial ports on 6 popular models can be seen in the photographs below. Each Serial port has 4 connections,
- V (Power)
- Ground
- Data in (or Rx)
- Data Out (or Tx).
Not all instruments require all 4 connections (some examples are covered later). The ground connection is connected to the wider copper ‘ground’ of the entire PCB, which means that the heat from a soldering iron is wicked away fast which can compromise a good joint. Instead, it is recommended that the ground is connected to the nearest PCB screw for a more reliable connection.
Listed further below are proven layouts for most Kobo Models.
Note that the most recent Bluefly’s (V12.2 and now V22) both use the Quectel L96-M33, which has an omnidirectional antenna. Over 30 hours of detailed trialling & NMEA data analysis has revealed it was VERY senstive to where it is mounted on the Kobo; whilst it appaers to work fine ‘most of the time‘ if mounted on any edge, under any operational stress (e.g. poor coverage, difficult physical environment) then positional errors were sometimes encountered. The mounting position shown below for the Bluefly V12.2 or Bluefly V22 on a Kobo Nia is proven and reliable.

The picture below shows the mounting/context from above; Bluefly variants V12.2 (and V22, same position) on the thin edge, with older Bluefly’s (V12.1 and earlier) being OK on the larger edge of the Nia

Below is the underside layout for the Kobo Nia with the older (V12.1 or earlier) Bluefly.

Here is the proven layout for the 2019 Kobo Clara HD

Further below are proven layouts on older Kobo models; the cables colours are: White is V, Yellow is Ground, Black is Data-In/Rx**, Red is Data-Out/Tx** **at the ‘kobo’ end


.
-
Inside a Kobo – SD Card
The SD Card is quite obvious – if you can’t see one, you may have accidentally bought one of the older/unsuitable Kobo’s that doesn’t have an SD Card. Subtle SD card holder differences are:
- Glo, Mini & Touch N905C – simple, sliding SD Card holder
- Clara HD, Glo HD and Touch 2.0 – a lower profile sliding holder and surrounded by components. Its awkward to get at with fingers, so carefully use a sharp point on the SD Card to help slide it out
- Touch N905B – a rare/unusual SD card holder where the thin/metal ‘cage’ first slides a few mm before it can be rotated
.
-
Inside a Kobo – Battery
Kobo’s have Lithium Polymer (LiPo) batteries, which require a very specific charging/discharging process – which is built into each Kobo battery – to prevent damage or fire. LiPo batteries can also become unstable and dangerous if physically manipulated, so think carefully before bending one trying to remove it. Kobo’s have a good safety record, but sometimes even major manufacturer’s can’t always get it right (Google the Samsung ‘Note 7’ recall of Sept 2017), so think carefully before making a hybrid modification to add a larger battery which could lead to an incident that is difficult to deal with when flying. If supplementary power is required, preferably use a 5v power bank connected to the kobo by micro USB.
.
-
Dissembling a Kobo
Once the rear cover has been removed, Kobo’s dissemble into 3 constituent parts:
- Printed Circuit Board (PCB)
- Battery
- Casing + Screen assembly
99% of breakages (see ‘14. What can go wrong‘ further below) will either be a broken screen or a broken micro USB socket on the PCB. Thus, it is possible to cannibalise Kobo’s to use spare parts for repair. The dissembly is achieved by:
- Remove the Kobo rear cover
- Unclip the battery connector from the PCB
- Unclip the loom/cable between the PCB and screen
- Undo several Philips screws holding the PCB to the main body
.
-
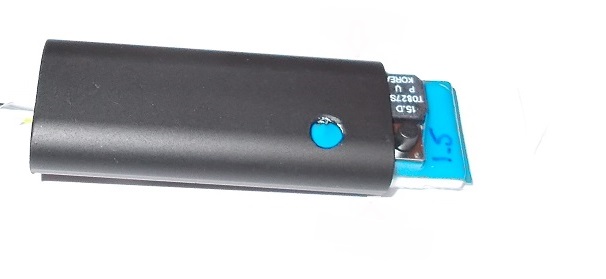
Connecting a Bluefly (GPS+Barometer+Vario)
The TTL version of the Bluefly (see Blueflyvario.com) is a tiny 16mm x 48mm PCB which combines a GPS, Barometer and audio vario. The GPS & Barometric data is multiplexed into one serial feed for the Kobo/XCSoar. There is no battery; it uses the Kobo’s power source.
All 4 wires will be required (see ‘Serial port’ above) between Bluefly and Kobo. The Tx (Transmit) & Rx (Receive) at one end should be connected to its ‘opposite’ at the other end, i.e. Tx to Rx, and Rx to Tx.
The Device setting in XCSoar is
- Port: ttymxc0
- Driver: Bluefly
- Baud rate: v1~v11 57,600 or v12, v22 115,200
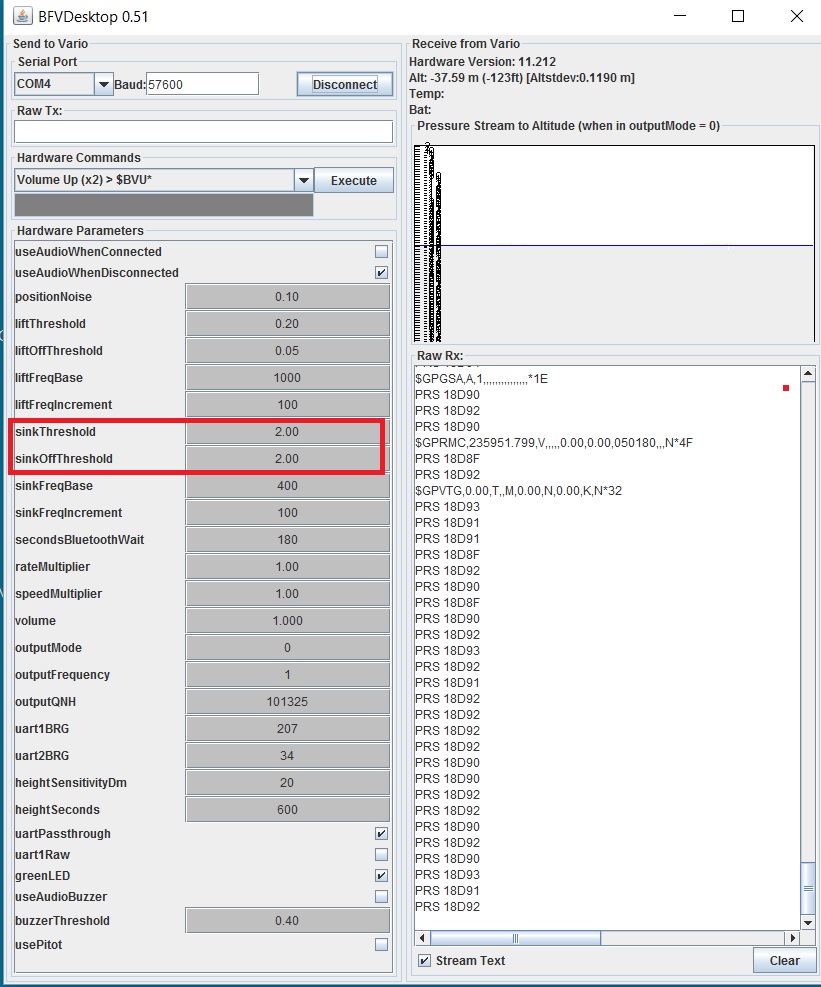
It is possible to change various internal settings on the Bluefly, and this is covered in detail on Alistair Dickie’s website at www.BlueFlyVario.com. However, just about all default settings are great for a nice, responsive and straightforward audio vario. Two settings the pilot may want to change are
Audio/down threshold – the default of minus 0.4 m/s, minus 80ft/min, means it will sound a lot if left unchanged. A popular threshold is minus 400 ft/min, but of course this is irrelevant if you already have a audio vario and will mute the Bluefly.
Automatic un-muting of the audio – this is useful if the Bluelfy is your primary vario, you have silenced it on launch, and want it to burst into life when you start flying. However, pilots using another vario will want to mute the Bluefly and not have it automatically un-muted.
Up until 2016, changing the settings has been a reasonably technical exercise, typically prior to installation and by connecting the Bluefly to your computer using a USB/Serial Interface, and using the downloadable BFV Desktop app (see picture below) to change the down threshold. Note that from 2016, an easier method is available, see XCSoar Tips and scroll down to 8. User defined Menus (XCI files)
.
-
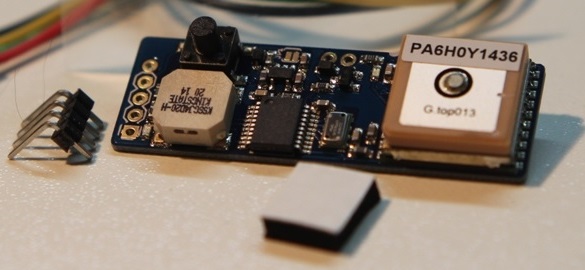
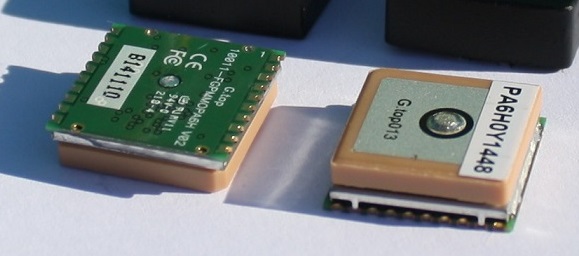
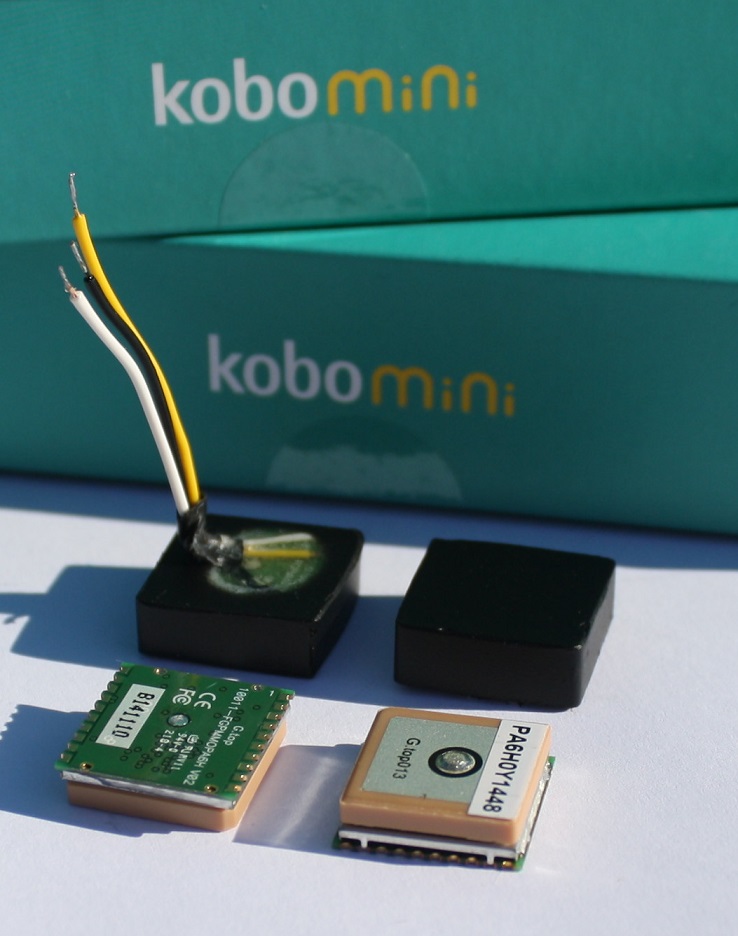
Connecting a GPS-only (Globaltop PA6H)
Note #1 that the new Kobo models (Clara HD, Touch 2, Glo HD & Aura 2) will either require an inline switch or pull-up resisitor/capacitor to work with a native GPS chip. Without this, the Kobo will freeze during startup and require a reset.
Note #2 the Globaltop PA6H is no longer in production from 2018, having been bought by SierraWireless. The obvious alternative is the SierraWireless XA1110 . Gethighsayhigh have not trialled a standalone XA1110, as we prefer the Bluefly Vario/GPS which has an inline switch (see above), a barometer, a vario and uses all of GPS, Glonass and Galilio positioning systems, hence the Bluefly is a better proposition at a low cost.
Only 3 wires are typically required between a GPS and Kobo (e.g. PA6H, see photo below). V (Power) and ground are required, plus the Tx to Rx from GPS to Kobo, i.e. there is a data signal from GPS to Kobo, but not vice-versa.
Soldering at the Kobo end is quite straightforward, but tricky at the GPS end with the contacts being just 1mm (and the gaps between less). Check carefully using a light/magnifier for fine solder strands that could possibly bridge a gap between contacts.
The Device setting in XCSoar is
- Port: ttymxc0
- Driver: Generic
- Baud rate: PA6H is 9,600 XA1110 is 115,200
Don’t use Vbackup! – One of the dozen or so connections on the GPS is known as Vbackup (pin #4), which allows for a permanent but very low power supply even when the main power (Vcc, pin #1) has been turned off. It is recommended that this is not used. It’s function is to ensure the GPS remembers the last position when the Kobo has been turned off, so that when next turned on again acquisition is immediate. This function works well for cars, but not for portable aircraft where landing and next take-off are often in different places, and besides, acquisition without Vbackup only takes 30 seconds anyway. But the biggest reason for not using Vbackup is to not have a wire trailing across the PCB to the battery (to circumvent the Kobo on/off switch) which has been known to pick up electrical noise and disturb the GPS signal.
.
-
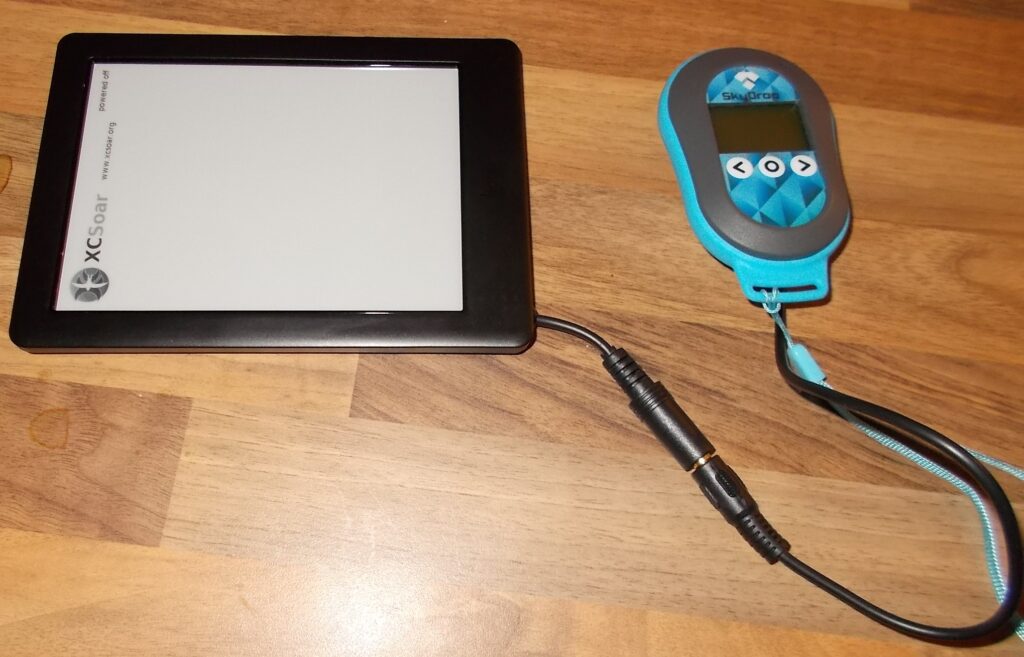
Connecting a Skydrop (GPS+Barometer+Vario)
As the Skydrop is an autonomous unit with its own power, only two wires are required, Tx (Skydrop) to Rx (Kobo), and ground.
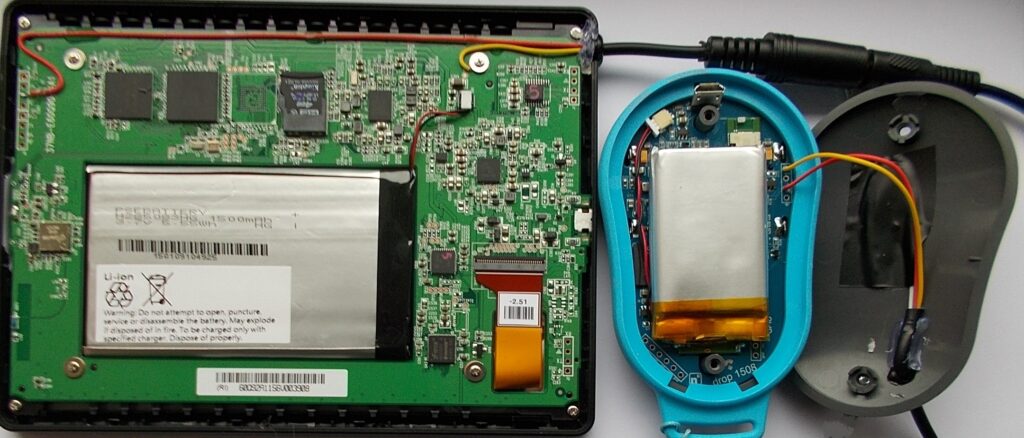
The downside is a wired connection between two separate units, as the Skydrop is too large to mount on a Kobo.
The Device setting in XCSoar is
- Port: ttymxc0
- Driver: Digifly
- Baud rate: 115,200
There are also 4 settings in various Skydrop menus which are
- Enable GPS: must be ‘ticked’
- Protocol: Digifly
- FWD GPS: must be ‘ticked’
- Uart-Function: Telemetry 115,200
13. Connecting a FLARM
Note: I haven’t tried this myself, but have been informed that this does actually work.
In a similar manner to the Skydrop (above), as the FLARM is an autonomous unit with its own power, only two wires are required, Tx (FLARM) to Rx (Kobo), and ground. This configuration was achieved with a 12v FLARM, despite the Kobo operating on 3.7v.
14. Encapsulating your Bluefly or GPS.
The Bluefly is a 16mm x 50mm printed circuit board around 8mm deep. Whilst shrink wrap alone is adequate protection for the circuitry, the push bottom switch (on/off/mute) would be easily damaged and hence a larger/physical protection is recommended.
Get High Stay High have now used over 450 of the containers below, and are available for purchase by self-builders who require a simple, elegant solution.
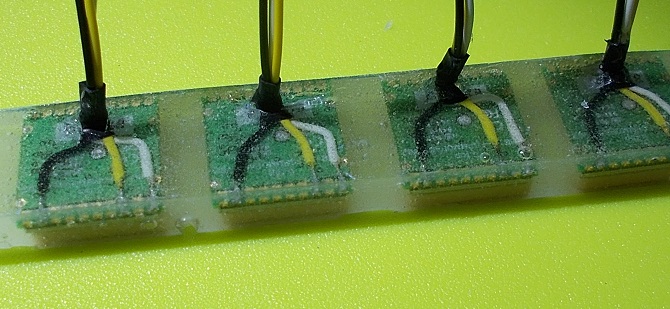
GPS-only – Some people just leave a raw/exposed GPS chip mounted on the Kobo body, but doing so would expose it to moisture. Encapsulating the chip in epoxy resin is very effective and reliable (see photo below) with the finished module being attached to the Kobo body with strong double sided tape (e.g. 3M VHB). Be careful what material you encapsulate the GPS in; for example, some well-run tests with/without Milliput modellers putty revealed that Milliput did in fact slightly inhibit reception.
.
15. What can go wrong with a Kobo?
Surprisingly little, which makes it a great little flight computer for aviation. Ereaders are however designed for a non-hostile environment (unlike PG take-offs, HG landings and retrieve trucks!) and hence the main two warnings are
Treat the Micro USB Socket with care – It is not as strong as (say) found in a cellphone that is designed for regular/frequent use. A Kobo used as an eReader should only require charging every month or so, but our requirement typically exceeds this. If a supplementary power supply is connected, then the USB lead can move around during use (e.g. a PG flight deck during takeoff) and eventually cause the USB socket to separate from the PCB. Furthermore, incorrect insertion of the USB plug has been known to break the USB socket. The USB socket is virtually unrepairable (there are 5 contacts, each around 0.4mm wide), although one UK specialist can sometimes repair them, albeit at an uneconomical cost (£39).
Treat the screen with care – The screen will take a reasonable amount of abuse, but underneath the front/more-durable surface is a glass membrane that can break if the unit is bent or heavily impacted. Most damage can be prevented by transporting the kobo in its original protective cardboard box. Damage is typically caused by leaving an unprotected kobo inside a HG or PG harness, which then suffers crushing during transport.
Most other software and operational issues are often easy to resolve; as follows
Failure to Start? (Soft reset) – If a kobo won’t start (typified by the small LED next to the on switch coming on briefly, but no further life) then a soft-reset by inserting a pin through the small pin hole may clear the issue (this is the Kobo-equivalent of the help desk advice ‘turn it off then on again’).
Failure to start after a soft reset? – Its possible to ‘brick’ a kobo, typically when connected to a computer (especially if you haven’t using the new/recent connection method from the main menu which is SYSTEM – EXPORT USB STORAGE; the old method of using NICKEL was sensitive to requiring a clean EJECT at the PC end; Apple devices were particularly bad in this respect). This is where your backup of the SD Card (see earlier) will help you recover. If you don’t have a backup, then contact Get High Stay High using the email on the CHOOSE/BUY tab and your SD Card can be recovered at zero cost for any Kobo model.