
- Starting with XCSoar
- Adding Maps, Waypoint & Airspace files to your Kobo
- Creating Maps
- Creating Waypoint files
- Creating Airspace files
- Creating temporary NOTAM airspace files
- Installing or upgrading XCSoar
- User defined Menus (XCI files)
1. Starting with XCSoar
The de-facto website is at XCSoar.org where you find a host of information, including the full/downloadable 200 page manual, the software downloads and much other stuff.
An instrument supplied by Get High Stay High will have a good/generic configuration that gives a screen looking like below, with a ‘swipe’ rightwards revealing a full map (no info boxes) and a further swipe revealing an airspace cross section view.

If you are starting from scratch, and want to expedite getting started, two quick options are:
- Install XCSoar and ‘copy’ a suitable config (e.g. as above)
- Get an SD Card with everything pre-installed and ready to use
For help with either of the above at zero/low cost (with a short user guide to get acqainted in minutes) just use the email on the CHOOSE/BUY tab.
.
2. Adding Maps, Waypoint & Airspace files to your Kobo
You first need to obtain a new map, airspace or waypoint file and have them available on your computer. Some good sources are covered in the sections 3, 4 & 5 below.
To get new files onto your Kobo, first connect the Kobo to your computer. There are two methods (named by their titles on the XCSoar menu), which are
- NICKEL – use for the Clara HD or Nia
- SYSTEM/EXPORT-USB-STORAGE. use for any Kobo model except the CLARA HD or Nia (we are awaiting XCSoar support for these new models).
Using SYSTEM/EXPORT-USB-STORAGE
- Turn the Kobo on
- Connect the USB lead between computer and Kobo
- Press SYSTEM and then EXPORT USB STORAGE (not USB-OTG)
- You should then hear the USB connected ‘ping’ , and you can now view the KoboeReader drive using a tool like windows explorer or equivalent (as in picture below, see the D: drive)
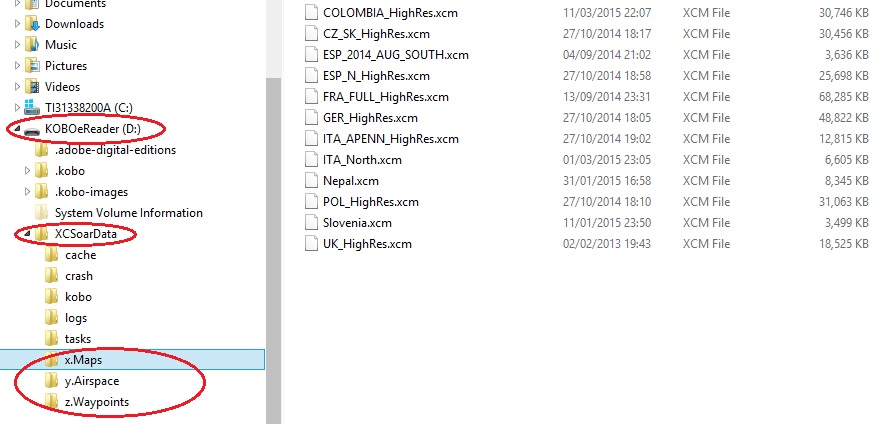
To upload a file, simply drag/drop the file you want to upload into any location under the directory XCSoarData. To make file management easier, it is recommended you create separate sub-directories (e.g. x.Maps, y.Airspace, and z.Waypoints) as annotated in the screen shot above.
The IGC log files (created automatically each flight) will be stored in the LOGS directory. To use one, simply copy/save any IGC file to your computer. You can use Tom Payne’s browser based tool XCPlanner to draw a trace of your flight; just drag/drop your IGC anywhere onto the map.
When finished, simply press OK on the Kobo (to end the USB connection and close the dialogue on the Kobo) and then CLOSE takes you back to the XCSoar menu. Note that the connection is all controlled from the Kobo
Using NICKEL
- Turn the Kobo on
- Connect the USB lead between computer and Kobo
- Press NICKEL – you will now need to wait for around 30 secs while the device turns itself back into an eReader (you may see the screen flash momentarily, and then be presented with a ‘Do you want to connect‘ dialogue – press CONNECT
- You should then hear the USB connected ‘ping’ , and you can now view the KoboeReader drive and upload/download files as described above for the SYSTEM/EXPORT-USB-STORAGE connection method.
- Once finished, it is VERY IMPORTANT to cleanly EJECT to disconnect the kobo using windows explorer. You can now safely remove the USB cable. Failure to do a clean eject can corrupt the SD Card inside (this is recoverable but inconvenient)
- Note that you are still in eReader mode, so you now need to use the Kobo button to POWER OFF, and on the next power up XCSoar will start. Hold the button for a second or so to properly power off, as a short bleep will put it into sleep mode, and when subsequently powering up, it will restart as an eReader.
3. Creating Maps
Maps can be obtained from the XCSoar.org website and there are two methods:
- Download one of the pre-generated maps
- Use the Map generation tool to generate a map for any location
Either of the above options will give you a ready-to-use map with a filetype of .xcm, e.g. Portugal.xcm
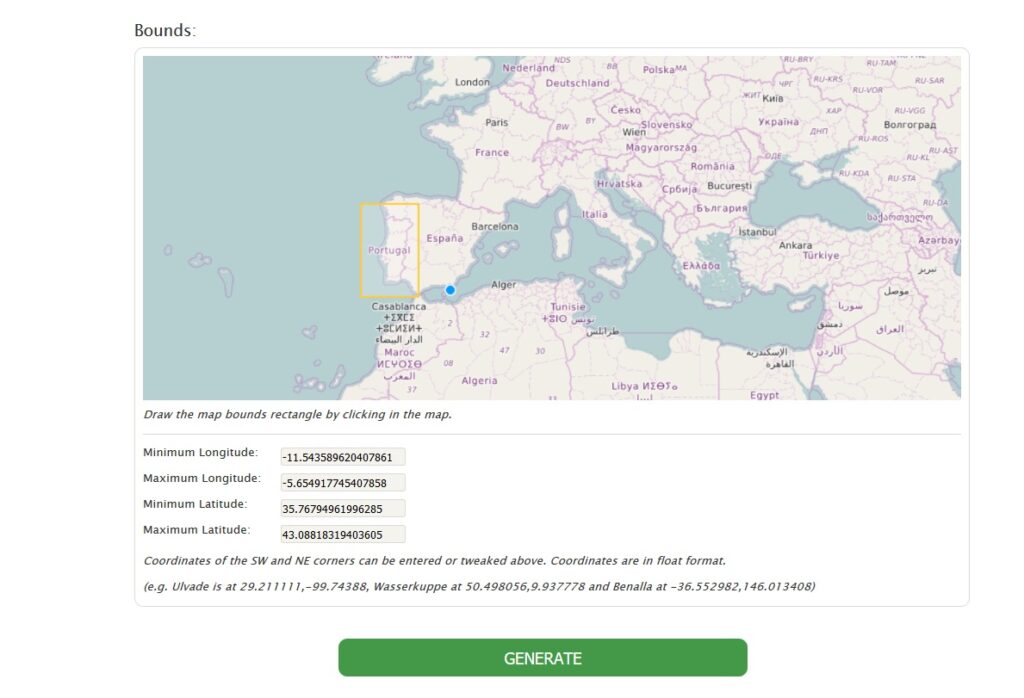
The map generator screen looks like below (you also have to specify map name, and level of detail you required). The example orange box drawn over Portugal was drawn with the mouse, and indicates the bounds of the map to be created when Generate is pressed. Try to make maps no larger than (say) the UK or France, as countries of this size will generate a reasonably large file size of around 70Mb, i.e. trying to map the whole of the Europe continent probably won’t work!
.
4. Creating Waypoint files
Whilst Waypoints can be created manually using XCsoar, it is far easier to create a selection of waypoints on your computer, save them to a file, and then transfer the file to XCSoar. XCSoar can handle many waypoint formats; the .cup (seeyou) format is very popular and will be used here.
The browser based tool flyxc.app (a newer development of xcplanner) is an excellent tool for creating waypoints. Once started in your browser (see URL name above). Click the 4th Icon on the right (a small ruler) and two default waypoints are displayed. Further waypoints can be added using a right hand click, and waypoints can be repositioned using the left hand mouse control.

In the example above, 6 waypoints were created, and clicking Download in the right hand menu opened up the Save dialogue box. If later you want to edit the waypoint file (e.g. to modify the rather mundane waypoint names T01, T02, etc to something more readable) then the Seeyou format (.cup) is probably the best format to choose.
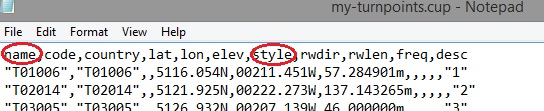
Below is an example .Cup file being edited in Notepad (Notepad is a text editor that comes free with Windows). The Name and Style parameters are the 1st and 6th, annotated as below. For example, you could change the waypoint Name T01006 to Westbury, which is far more user friendly. Changing the waypoint Style (currently null) to 2 will make XCSoar display that waypoint as a 4mm circular blob instead of a near invisible ‘cross’.
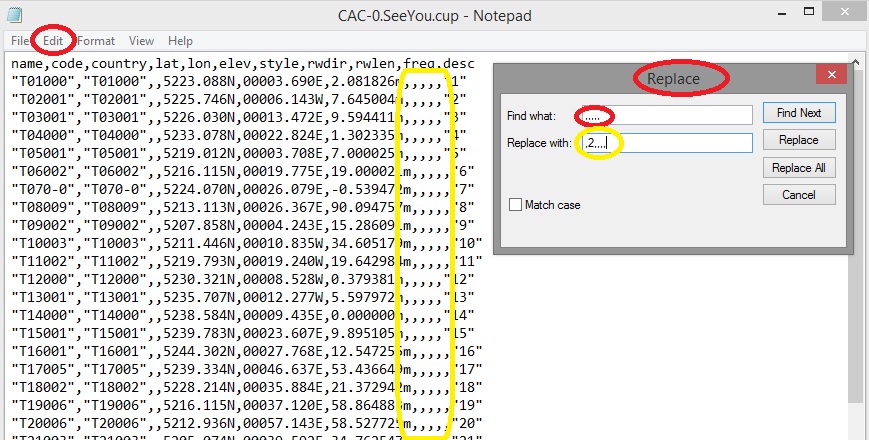
If you want to change the Style on a large number of waypoints, you can perform a global change as follows;
- Select EDIT then REPLACE
- In Find What, enter five comma’s, e.g. ,,,,,
- In Replace With, enter ,2,,,, (same number of comma’s with the new style inserted)
- Pressing REPLACE ALL then changes all occurrences
.
5. Creating Airspace files
The most useful resource for airspace files for many popular worldwide locations is Soaringweb.org.
The airspace files are typically maintained by volunteers, and the website is organised by region and then country to help you locate what you need. Once you have clicked on an airspace file and it opens in your browser, you will need to save it to your computer as a .txt (text) so that when loaded to your Kobo it is recognised as an airspace file.
Note that the UK is slightly different, and instead of a hand-crafted file, we have a browser-based web program called ASSELECT (https://asselect.uk/) which you use to generate an airspace file. This program has kindly been produced by Geoff Brown, who diligently processes each monthly AIP (a part automated, part manual process) to ensure we can produce up-to-date files. Rather than us having to monotonously generate a new airspace file every 28 days, it is better to check Geoff’s useful ‘Update History‘ (bottom right in screenshot) to see if there are any material changes that affect you – quite often there are no significant changes.

There are 4 tabs; the ‘MAIN‘ tab (as shown above) give you the opportunity to include/exclude/modify uncontrolled airspace to suit your needs (obviously all controlled airspace is included). The other 3 tabs give you a similar opportunity to include/exclude various features and concessions such as Wave boxes, LOA’s, etc. When you are ready, selected the Openair format, and pressing OK will generate your airspace file.
.
6. Creating temporary NOTAM airspace files
You will probably only need this if (i) you live in a country with regular/temporary NOTAM changes, and (ii) you fly cross country hence will need to be aware of such temporary airspace. Here in the south UK I have found approx. one in five summertime XC days that have significant notams which warrant the creation of a daily NOTAM airspace file.
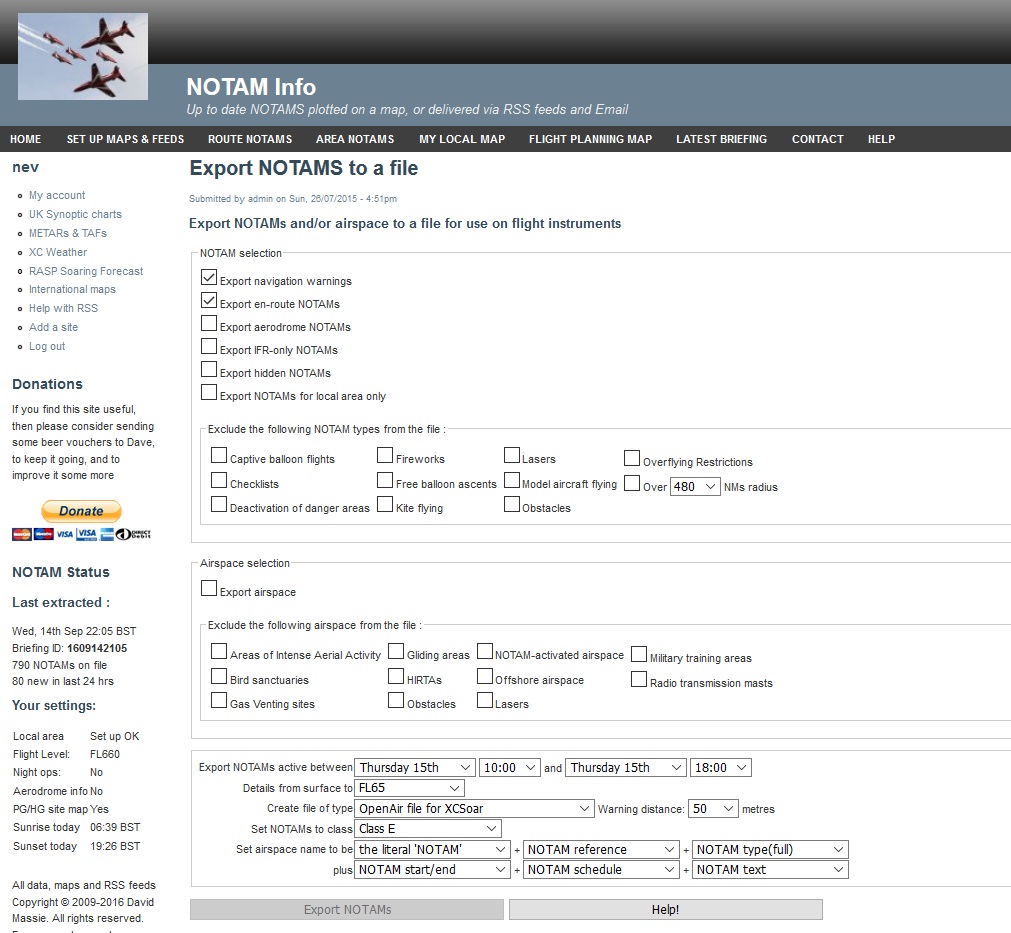
For some years now Dave Massie has maintained/developed the superb website notaminfo.com and many pilots will be familiar with the visual user interface (see example below). The website now covers 20 countries, mainly European ones.

In 2015 Dave kindly added a NOTAM EXPORT page (note there is no button, you need to be signed in and then add /EXPORT to the URL, e.g. http://notaminfo.com/export). The export function allows a parametrised filtering of NOTAMS which can then be exported to a daily NOTAM file. There is good help/guidance on the notaminfo website. Once you have created a notam airspace file, you can add it to XCSoar, and include it for your one days flying that the NOTAMs apply to (XCSoar allows 2 airspace files to be included). The EXPORT screen looks like this:
.
7. Installing or upgrading XCSoar
2022 Update: XCsoar has moved through several 7.x versions, and many kobo users have found these to be problematic on the most recent (and still unsupported) devices such as the Clara HD and the Nia. It is recommended you use XCsoar version 6.8.11, which is super-stable and proven across kobo models Clara HD and Nia, the two most likely target units for self-builders.
Whilst the upgrading of phones, tablets and computers can often be fraught with techniness and potential to mess up, upgrading XCSoar is very simple. It is a similar process for a first time install or subsequent upgrade to a newer version. If upgrading to a newer version, your files (e.g. Maps, airspace, waypoints, logs) and your configuration will not be changed. When it comes to ‘new’ features, as a guide:
- New and non-configurable features will simply ‘appear’ (e.g. improved rendering)
- New configurable features may need turning on within the menus (e.g. a new option to show ‘airpsace labels’)
Step 1 – Download the latest version of XCSoar for the Kobo from the XCSoar Website (example screen below), and save it to your computer. The download file will be called KoboRoot.Tgz.

Step 2 – Connect you Kobo to the computer as follows:
- If you already have XCSoar then use NICKEL or SYSTEM – EXPORT USB STORAGE method as described in section 2, Getting Maps, Waypoint and Airspace files onto your Kobo.
- If its a new Kobo (without XCSoar), you’ll need to connect via the native Kobo dialogue that prompts you to connect to your computer (not via Wifi) when you plug the USB cable in.
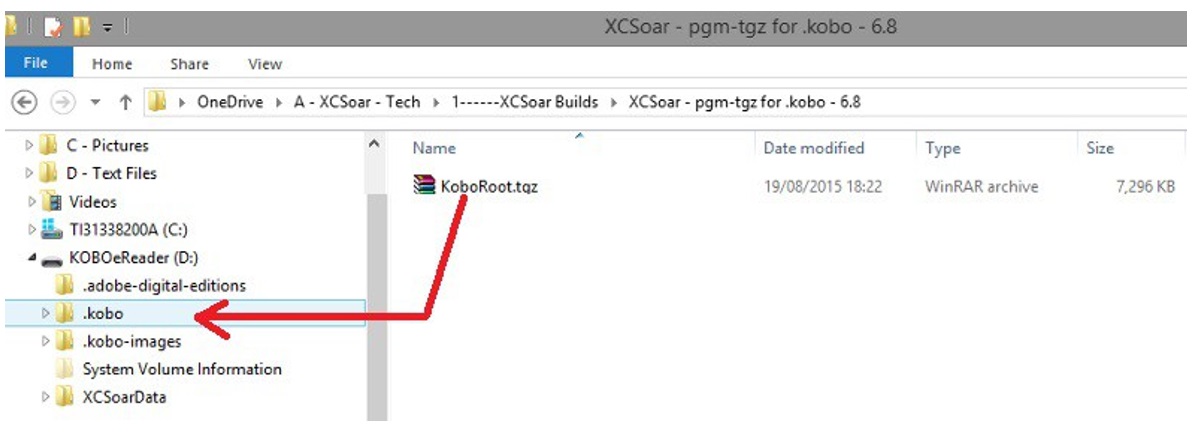
Step 3 – Drag/drop the KoboRoot.Tgz file into the Kobo directory named .Kobo Important: Note the ‘dot’ prefix, as there is another directory named Kobo without a dot prefix!
Step 4 – Disconnect the Kobo; if its a new Kobo you will need to EJECT the drive from the PC before unplugging the USB cable, or if you used SYSTEM – EXPORT USB STORAGE to connect then you can press OK to close the dialogue on the Kobo. After this, you should see the LED near the on/off switch flicker, and the software will then first install, then the unit will restart and show the XCSoar menu (it takes a few minutes). Sometimes it doesn’t happen automatically, in which case turn the unit off, leave for 10 seconds then turn on, after which the install/restart process will happen.
.
8. User defined Menus (XCI files)
During 2016 XCSoar introduced functionality to tailor XCSoar menus and add buttons that can be instructed to perform various functions (known as XCI files, or XCSoar Initialisation). The example that follows is a simple menu to allow Kobo/XCSoar unit to control a few simple aspects of a Bluefly GPS/Vario.
Context: Most users simply turn their Bluefly on and use the GPS and Altitude data that is streamed into the Kobo/XCSoar unit. However, the Bluefly hardware (which has its own autonomous processor) has around 30 different commands that can be used to change characteristics such as volume, audio up/down thresholds, the style of audio beep, etc.
This menu is created by
- Adding the XCI file to the XCSoarData directory (a copy of the content of this XCI file is listed/annotated further below)
- Selecting this new file from Menu-Config-System-Look-Language,input-Events
- Close (to save), then restart XCSoar
You can get this file at : https://drive.google.com/open?id=1apP2avZKYzw0PQZMrDQL5fJbBxR1-4vu
On pressing the M (menu) button on the XCsoar screen, the following menu is presented, and the button in the bottom left labelled BLUEFLY is a new Bluefly-related menu that the XCI file added.

Pressing the BLUEFLY button presents the following screen:

First, try pressing the TestBeep button, which will beep to confirm the connection to the Bluefly is all good: note that the Bluefly must be turned ON, and XCSoar must be in FLY (not SIM) mode.
Vol Up and Vol Down turns the volume up/down; after each press the sound level is confirmed by the Bluelfy
With all other options a press of the button will change the firmware without any visible/audible result. For example, pressing Sink1ms sets the audio/down threshold to 1ms (200fpm), and pressing Sink2ms sets the audio/down threshold to 2ms (400fpm). The only way to check this has taken effect is to fly in sink, or to clasp your instrument and run down the stairs fast (1ms is achievable, but 2ms would probably be a health & saftey risk).
LXMode and BFMode will both change the output mode and output frequency. BFMode outputs data at 50Hz and will require the Bluefly driver to be used (chosen in device settings), and LXMode outputs data at 5Hz and will require the LX driver. Note that with the wrong driver selected, the GPS data still gets used, but the barometric data doesn’t. Some of the more recent and high resolution Kobo’s seem to perform better in LXMode, probably because the reduced data input allows the kobo to better cope with the overhead of managing a high definition screen.
Toggoff will set a Bluefly parameter called Togglethreshold to 10. In summary, when you now use the Bluefly push button to mute the audio, the Bluefly won’t now “un-mute” automatically when then Bluefly detects movement (you will want it like this if the Bluefly isn’t your primary vario).
Any of the 30 or so Bluefly settings can be changed (too much detail for this tutorial here). To get an idea of what can be changed, see the range of commands in the hardware settings manual at http://www.blueflyvario.com/support/.
The data within the XCI file used in the example above looks like below. The first block of data (turqouise) creates the new menu option called Bluefly, and the subsequent blocks each define an option within the Bluefly menu, e.g. Vol Up, Vol Down, etc. The Bluefly commands are the 3 character strings in red.
